I can just come back to this thread instead of searching the internet in vain for the one tutorial that worked for me.
Installing Samba on Ubuntu
Install Samba: sudo apt-get install samba
Edit the config file: sudo nano /etc/samba/smb.conf
Go to the end of the file, comment out the printer stuff, then add this:
[files]
path = /files
valid users = @decryption
browsable = yes
writable = yes
read only = no
Add a Samba user: sudo smbpasswd -a decryption
Enable that user: sudo smbpasswd -e decryption
Restart Samba: sudo systemctl restart smbd
Check the permissions on the shared directory to make sure the user you just made can access the files properly and you’re good to go.
The steps for Alpine Linux are pretty much the same, but you install it with: apk add samba and restart the service with service restart samba
Using a DVB-T TV Tuner
Step 1 - Check the card/USB device is detected by the computer
Use dmesg to see if the device is picked up when plugged in/at boot. With modern kernels the vast majority of DVB tuner devices should “just work”, but you might need to download the firmware if it isn’t included in your distro. See:

Have a Google around for the filename and you’ll find it. When you’ve got the firmware file, chuck it in /lib/firmware
Hauppauge have a nice Debian/Ubuntu repo for all this stuff. You need to install that firmware, even though it looks good in dmesg and a device is setup. Without it the tuner will report 0db signal and won’t find any channels.
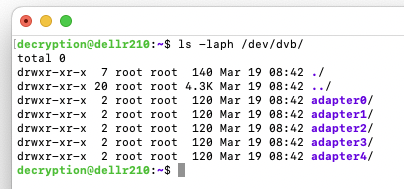
You should be able to view an adapter device for each tuner in /dev/dvb - here’s my setup with a Quad TV and a single USB stick:
Step 2 - Install some command line utilities
The package names for Ubuntu are dvb-tools & dvb-apps. They’re documented on the Linux TV Wiki. You also need w-scan to generate the initial scan file.
Step 3 - Scan
Now you need to tell the computer what the frequencies are for the TV channels in your area. It’ll create a “channels.conf” file that is used in the next step.
w_scan -c AU -x >> channels.conf
This only needs to be done once. Doesn’t need to be done per tuner. You can also skip this step and use the contents of /usr/share/dvb/dvb-t, but I prefer to do a scan my area myself as some of the pre-made scans can be old or there’s nothing for your particular broadcast tower (i.e: the Bourke Street & South Yarra re-transmitters for inner-city Melbourne instead of Mt Dandenong).
Step 4 - Tune
Once you’ve got a list of all the frequencies with a DVB broadcast on them (channels.conf), you need to make a list of all the channels (aka program IDs/service IDs) as there are multiple streams of video contained within a single frequency:
dvbv5-scan -I CHANNEL channels.conf -o dvb_channels.conf
This step can sometimes semi-fail, with not all the channels getting names, e.g:
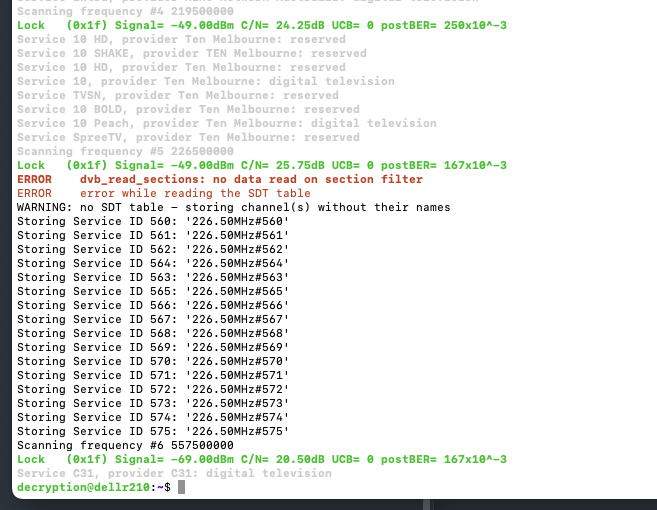
If you reboot or unplug the tuner and try again it’ll grab all the channel names eventually.
Step 5 - Record
There’s now a list of all the channels (dvb_channel.conf) that the dvbv5-zap app can tap into. You need to use the channel name (not the service ID, annoyingly). Here’s a the commands I can run to record all 5 network’s HD main channels simultaneously.
sudo dvbv5-zap -a 0 -c dvb_channel.conf "ABCTV HD" -t 60 -o abc_test.ts
sudo dvbv5-zap -a 1 -c dvb_channel.conf "SBS ONE HD" -t 60 -o sbs_test.ts
sudo dvbv5-zap -a 2 -c dvb_channel.conf "10 HD" -t 60 -o 10test.ts
sudo dvbv5-zap -a 3 -c dvb_channel.conf "9HD Melbourne" -t 60 -o 9test.ts
sudo dvbv5-zap -a 4 -c dvb_channel.conf "7HD Melbourne" -t 60 -o 7test.ts
It’s not that hard! You only have to spend a Saturday morning trawling through documentation online.
Install ffmpeg 5/latest version on Ubuntu
Add these repos that contain the latest version of ffmpeg and the associated crap it needs:
add-apt-repository ppa:savoury1/ffmpeg5
add-apt-repository ppa:savoury1/ffmpeg4
If add-apt-repository doesn’t work, install software-properties-common - might not be on the minimal/light distro of Ubuntu installed on some VPSes
Now update the apt package list and upgrade all the packages
apt update
apt full-upgrade
Finally, install ffmpeg
apt install ffmpeg
Check to make sure the latest version is installed
ffmpeg -v
First boot of headless Raspberry Pi OS tips
SSH is not enabled by default, so add a file called ssh to the /boot directory on the microSD card.
As of April 2022, the default install of Raspberry Pi OS no longer includes the “pi” user. Need to add your own user on the microSD card before you pop it in to the Raspberry Pi:
https://www.raspberrypi.com/documentation/computers/configuration.html#configuring-a-user
Add a file called userconf.txt into /boot
Inside that file should be a username:password - but the password has to be encrypted. Run the following on a Linux system to get an encrypted password:
echo 'mypassword' | openssl passwd -6 -stdin
Not sure how to do this on a Mac.
How to enable TCP BRR on Raspberry Pi OS
Not enabled by default and gives a massive speed boost for heavy network traffic so you really want it turned on.
sudo bash -c 'echo "net.core.default_qdisc=fq" >> /etc/sysctl.conf'
sudo bash -c 'echo "net.ipv4.tcp_congestion_control=bbr" >> /etc/sysctl.conf'
sudo sysctl -p
sudo reboot
Dunno what it does (shuffles packets around in a more efficient manner???) but it fucken works well. Don’t ask questions, enjoy the bandwidth.
How to mount a Windows share on Linux
Check that cifs-utils is installed.
Create a credentials file in home directory that has this in it:
user=decryption
password=myeyesonly
domain=WORKGROUP
Then run:
sudo mount -t cifs -o rw,vers=3.0,credentials=/home/decryption/.credentials,uid=$(id -u),gid=$(id -g) //192.168.1.81/uploadedscans /windowspc/
If you wanna keep the mount persistent between boots, add this to /etc/fstab:
//192.168.1.81/uploadedscans /windowspc cifs uid=0,credentials=/home/decryption/.credentials,iocharset=utf8,vers=3.0,noperm 0 0
Basic Use of GNU Parallel
GNU Parallel basically splits up a command to run many of them simultaneously across all the cores in your computer. Way more info than I could ever give is in the documentation. This is just a basic example and explainer:
parallel -v tar -zxvf {} --one-top-level ::: ~/6tbblock/*.tar.gz
the {} bit basically takes the input of the filename at the end of the ::: and acts like a FOR loop, iterating through the directory of .tar.gz files. This command will extract all the .tar.gz files in the 6tbblock directory, running the tar command multiple times at once (up to as many cores as are in the computer).
cat ~/urls.txt | parallel -v -v -j 50 aria2c -c -s 16 -x 16 -k 1M -j 1 {}
Parallel will take the input of that text file (a bunch of URLs) and feed it into the aria2c command where {}. The -j switch means it will run 50 aria2c commands at once, instead of limiting it to the amount of CPU cores.
You can also use {.} to strip the file extension, e.g:
ls | parallel ia upload {.} /4tb/corel/{}
{} gets you file.ext but {.} strips whatever is after the dot.
The Internet Archive has a good post on how to use GNU Parallel with its Python app:
https://archive.org/developers/internetarchive/parallel.html
A total idiot’s guide to using cut & awk
There’s many ways to slice up text on Linux, but two I’ve found handy are awk and cut. Both can do many, many things that are far beyond my intelligence level. These are the toddler-esque methods I use them.
cut -f 1 -d '.'
If you’ve got a filename like coolfile.tar.gz, running that command on the text will get rid of the .tar.gz and give you just coolfile.
If you’ve got a URL like https://archive.org/download/edn-1995_08_17/edn-1995_08_17.cbz and run this on the text:
cut -f 6 -d '/'
It will strip away everything before the 6th /, resulting in just the last portion edn-1995_08_17.cbz.
awk is good for easily taking a column of text and getting rid of the rest, take this small example:
-rw-rw-r--  1 ubuntu ubuntu  3.7G May 24 11:07  wireless_world-1983_03-original-scan-tiffs.tar.gz
-rw-rw-r--  1 ubuntu ubuntu  2.9G May 24 11:18  your_computer-1992_06-original-scan-tiffs.tar.gz
-rw-rw-r--  1 ubuntu ubuntu  3.5G May 24 11:32  your_computer-1993_04-original-scan-tiffs.tar.gz
If I run awk '{ print $5}' it will give me this:
3.7G
2.9G
3.5G
Which is the 5th column of data. If I put in $4 instead of $5, it will give me
ubuntu
ubuntu
ubuntu
Nifty.
You can do heaps more but I am not very bright and this covers most of my use cases.
Quick firewall setup with UFW
Very basic but I keep forgetting it. Digital Ocean’s tutorial covers the bases too.
ufw default allow outgoing - allow all traffic out
ufw default deny incoming - block everything coming in
ufw allow from xxx.xxx.xxx.xxx - add an exception for an IP
ufw enable - turn it on
ufw status verbose - verify it was added, view the firewall status
If I wanted to allow public web use:
ufw allow 443 - opens up port 443 for everyone
That’s it, the firewall is running now. Safe and secure, unhackable.
Multi-part resumable FTP downloads with lftp & pget
This is mostly useful for downloading gear off a seedbox or some other FTP server using the full speed of your connection rather than a single or multiple files at a time (i.e: large ISOs, big files).
lftp has a feature where it can also mirror a directory structure so you don’t have to download each directory one by one.
https://dade2.net/kb/complete-lftp-command-tutorial/
Login: lftp -u username,password ftp.server.com
Browse around via ls
Then use:
mirror --parallel=10 to download multiple files at once (good for directories with lots of little files)
or
mirror -c --use-pget-n=10 to download files with 10 threads each (i.e: 1GB file split into 100MB chunks, downloading 10 pieces at once).
The -c switch also makes it resumeable so if you get disconnected, it can pick up where it left off.
Use mirror --only-newer to get stuff you haven’t already downloaded.
Accepting the SSH fingerprint of multiple servers automatically & running commands on multiple servers at once
I learned this one from ChatGPT.
xargs -I{} ssh-keyscan {} | tee -a ~/.ssh/known_hosts 2>> error_log.txt < servers.txt
This will take a list of servers in servers.txt and automatically add their SSH fingerprint to ~/.ssh/known_hosts and throw any errors into error_log.txt should they not be successfully added. Handy!
parallel-ssh -h servers.txt -i -l root "uname -a"
This command will take the contents of servers.txt and run uname -a on all of them at once as the user root. Here’s an example of the output:
decryption@r220:~$ parallel-ssh -h servers.txt -i -l root "uname -a"

[**1**] 07:37:51 [**SUCCESS**] cheapest-sgp1

Linux cheapest-sgp1 6.1.0-9-amd64 #1 SMP PREEMPT_DYNAMIC Debian 6.1.27-1 (2023-05-08) x86_64 GNU/Linux

[**2**] 07:37:52 [**SUCCESS**] cheapest-blr1

Linux cheapest-blr1 6.1.0-9-amd64 #1 SMP PREEMPT_DYNAMIC Debian 6.1.27-1 (2023-05-08) x86_64 GNU/Linux

[**3**] 07:37:52 [**SUCCESS**] cheapest-sfo2

Linux cheapest-sfo2 6.1.0-9-amd64 #1 SMP PREEMPT_DYNAMIC Debian 6.1.27-1 (2023-05-08) x86_64 GNU/Linux

[**4**] 07:37:52 [**SUCCESS**] cheapest-sfo3

Linux cheapest-sfo3 6.1.0-9-amd64 #1 SMP PREEMPT_DYNAMIC Debian 6.1.27-1 (2023-05-08) x86_64 GNU/Linux

[**5**] 07:37:53 [**SUCCESS**] cheapest-tor1

Linux cheapest-tor1 6.1.0-9-amd64 #1 SMP PREEMPT_DYNAMIC Debian 6.1.27-1 (2023-05-08) x86_64 GNU/Linux

[**6**] 07:37:53 [**SUCCESS**] cheapest-nyc1

Linux cheapest-nyc1 6.1.0-9-amd64 #1 SMP PREEMPT_DYNAMIC Debian 6.1.27-1 (2023-05-08) x86_64 GNU/Linux

[**7**] 07:37:53 [**SUCCESS**] cheapest-nyc3

Linux cheapest-nyc3 6.1.0-9-amd64 #1 SMP PREEMPT_DYNAMIC Debian 6.1.27-1 (2023-05-08) x86_64 GNU/Linux

[**8**] 07:37:53 [**SUCCESS**] cheapest-lon1

Linux cheapest-lon1 6.1.0-9-amd64 #1 SMP PREEMPT_DYNAMIC Debian 6.1.27-1 (2023-05-08) x86_64 GNU/Linux

[**9**] 07:37:53 [**SUCCESS**] cheapest-ams3

Linux cheapest-ams3 6.1.0-9-amd64 #1 SMP PREEMPT_DYNAMIC Debian 6.1.27-1 (2023-05-08) x86_64 GNU/Linux

[**10**] 07:37:53 [**SUCCESS**] cheapest-fra1

Linux cheapest-fra1 6.1.0-9-amd64 #1 SMP PREEMPT_DYNAMIC Debian 6.1.27-1 (2023-05-08) x86_64 GNU/Linux
Nuke a disk’s partition table quickly
Depending where a disk is used, there’s junk in the boot/partition table area that confuses an operating system when all you want is a normal GPT disk.
Use the command:
wipefs -a /dev/sda
And you’ll wipe it entirely so cfdisk/fdisk doesn’t whinge. Obviously, this places your data at risk and while it may be able to be recovered, it’ll be a huge pain in the arse so don’t do it on a disk you have important data on.
Thank you random person on Server Fault!
How to add a disk to a Debian box
Find the name of the disk (e.g: /dev/sda)
fdisk -l
Wipe it clean using this command:
wipefs -a /dev/sda
Then partition the disk. I like using cfdisk. Should show up as entirely free space because we wiped the partition data. Use the entire disk and the default Linux filesystem type. Write the changes to disk, then quit.
Now format the disk with the EXT4 file system. We are keeping it simple, no fancy XFS, BTRFS or ZFS for us.
mkfs.ext4 /dev/sda
Now the disk is ready to be mounted. We make a “mount point” (a directory to mount the disk in):
mkdir /storage
Then get the UUID of the disk to add it to /etc/fstab so when the computer is rebooted, it automatically mounts this disk and we can see the files.
blkid
Which should show us something like this:
/dev/sda: UUID="1c2b6a84-5f7a-4a8d-b421-a6a52bf17f48" BLOCK_SIZE="4096" TYPE="ext4"
Now we edit /etc/fstab (fstab stands for file system table, no stabbing involved).
nano /etc/fstab
Jump to the end of the file and paste this in, replacing the UUID with the UUID of our disk and the mount point (/storage in this case) with wherever you want the disk mounted.
UUID=1c2b6a84-5f7a-4a8d-b421-a6a52bf17f48 /storage ext4 defaults,noatime 0 2
I don’t know what all the options are here. I should probably read the fstab man page.
Save the edited file and reboot.
When the computer loads up again, the disk should be mounted at /storage - we can check it works by doing df -h /storage and it’ll show us how much disk space is left on /storage.
root@optiplex:~# df -h /storage
Filesystem      Size  Used Avail Use% Mounted on
/dev/sda         17T   24K   16T   1% /storage
Probably need to set some permissions as the entire disk is owned by root (good ol chmod and chown), but that’s a story for another day.
How to update all Docker containers at once
When a new version of Sabnzbd or Plex rolls around, the easiest way to update it is to update the entire docker container. All you need to do is “pull” the container again and you’re set, as the config is stored on your file system, not in the container, so all the settings are restored when a new container image is installed.
You can set it up so it all happens automatically when a new version is published, but I prefer to wait and see what’s happening with the update before upgrading, so this is how I do it.
- Make sure you’ve got everything set up in a Docker Compose file. It’s like a list of instructions for Docker to set up all your containers at once rather than one by one at the command line. Here’s mine for example:
name: optiplex

services:
  sabnzbd:
    image: lscr.io/linuxserver/sabnzbd:latest
    container_name: sabnzbd
    environment:
      - PUID=0
      - PGID=0
      - TZ=Australia/Victoria
    volumes:
      - /root/dockers/sabnzbd:/config
      - /storage:/downloads
      - /root/sabtmp:/incomplete-downloads
    ports:
      - 8080:8080
    restart: unless-stopped

  sonarr:
    image: lscr.io/linuxserver/sonarr:latest
    container_name: sonarr
    environment:
      - PUID=0
      - PGID=0
      - TZ=Australia/Victoria
    volumes:
      - /root/dockers/sonarr:/config
      - /storage/tv:/downloads
      - /storage:/downloads
    ports:
      - 8989:8989
    restart: unless-stopped

  plex:
    image: plexinc/pms-docker:latest
    container_name: plex
    network_mode: host
    environment:
      - PLEX_UID=0
      - PLEX_GID=0
      - TZ=Australia/Victoria
    volumes:
      - /root/dockers/plex:/config
      - /storage:/storage
    devices:
      - /dev/dri:/dev/dri
    restart: unless-stopped

  qbittorrent:
    image: lscr.io/linuxserver/qbittorrent:latest
    container_name: qbittorrent
    environment:
      - PUID=0
      - PGID=0
      - TZ=Australia/Victoria
      - WEBUI_PORT=8081
      - TORRENTING_PORT=51521
    volumes:
      - /root/dockers/qbittorrent:/config
      - /storage:/storage
    ports:
      - 8081:8081
      - 51521:51521
      - 51521:51521/udp
    restart: unless-stopped
Running everything as root probably isn’t how you’re supposed to do it, but fuck it, it works.
- Make sure you’ve installed Docker with the Compose plug-in installed. There’s a 99% chance it already is, but if it’s not, follow these instructions:
- Run this command to actually do the updating of the containers. It will grab the latest ones from the repos, install them using the same settings as in the Compose file and then remove the old images to save disk space:
docker compose pull && docker compose up -d && docker image prune -af
- That’s it, you’re done. Enjoy the latest version of whatever it is you’re running in your containers.
Make bootable USB from Windows ISO on Linux
WoeUSB is a really easy way to make a bootable USB drive from a Windows ISO downloaded off Microsoft’s website.
Hasn’t been updated in a while but it still works fine! No point repeating their doco here, just a reminder for myself that it exists next time I need to make a Windows boot USB.
Reverse Proxy for Docker Containers with Let’s Encrypt SSL using Caddy
Add this to your compose.yml file:
caddy:
    image: caddy:latest
    container_name: caddy
    ports:
      - "80:80"
      - "443:443"
    volumes:
      - ./Caddyfile:/etc/caddy/Caddyfile
      - /home/decryption/caddy/caddy_data:/data
      - /home/decryption/caddy/caddy_config:/config
    restart: unless-stopped

volumes:
  caddy_data:
  caddy_config:
Create a file called Caddyfile. The first line is your domain name (I assume you have an DNS A-record for the domain already pointing at your external IP address). The second line is the name of your docker container (find it by typing docker -ps a) and the port it runs on.
nzb.heyinternet.com:443 {
    reverse_proxy nzbhydra2:5076
}
Run docker compose pull && docker compose up -d && docker image prune -af to create the Caddy docker container, wait a minute or two and boom, you should be able to visit https://yourdomain.com and it’ll load whatever is running on your docker container over SSL. Caddy does all the Let’s Encrypt stuff automagically.
If you have multiple docker containers and don’t want to set up a subdomain for each one, you can do this instead:
heyinternet.com {
    handle /nzb* {
        reverse_proxy nzbhydra:5076
    }

    handle /sonarr* {
        reverse_proxy sonarr:8989
    }

    @cleanurls path_regexp ^/(nzbhydra|sonarr)/$
    redir @cleanurls /{1}
}
This will make heyinternet.com/nzb go to nzbhydra and heyinternet.com/sonarr go to sonarr, all with SSL enabled so it’s secure and shit.